Monthly Archives: April 2016

Coconut ‘Fried’ Chicken

This is the perfect weeknight dinner!!  It’s flavorful, fun, and on the table in under 30 minutes…did I mention it’s healthy too??!!  A definite win-win friends!

Now I like to marinate the chicken (2 simple ingredients!) for 6-8 hours..before you head in to work.  However, if you’re worried you’ll forget to quickly prepare this in the busy AM, then you can do this the night before!  So now you just wake up & go!!…After work you can pop in the oven and have dinner in minutes!

This lean chicken has a great savory crunch to it with the added hint of sweetness.  Kids LOVE it!!  …and parents don’t have to feel guilty 😉

*Can be prepared Gluten-Free as well 

*Dipping Sauce:  I make by eye considering the persons taste buds.  Sweeter (more honey), Hotter (more sriracha), etc..  But a basic recipe is below.

The Starting Lineup

  • 2 lbs chicken tenders (or Breasts cut into strips)
  • 1 cup honey mustard
  • 1 cup mayonaisse 
  • 2 cups panko bread crumbs (or Gluten Free bread crumbs)
  • 2 cups shredded sweetened coconut
  • Pinch of kosher salt & pepper

Dipping Sauce (optional)

  • Honey mustard (1/4 cup)
  • Honey (1 tbsp)
  • Sriracha (1-2 tsp)
  • Rice wine vinegar (SMALL splash)

Garnish (optional)

  • Shredded sweetened coconut
  • Cilantro, chopped  

Easy!!!  The night before OR before you head out for work, marinate the chicken in the cup of honey mustard and cup of mayonnaise mixture.  Cover and place in the fridge.

Now let us imagine that you’re already home and ready for dinner!!  So here you’ll simply preheat your oven to 425 degrees and take the chicken out of the refridgerator.  Prepare a baking sheet with either foil or a silpat sheet and if you’d like, you can add a grate atop.  *Remember to spray the grate and/or foil with non-stick spray, however, the silpat liner will be fine with out spray. 

 Have a shallow dish prepared with the panko (or gluten free breadcrumbs), coconut and salt & pepper.  Next, one-by-one, coat the honey mustard/mayo’d chicken into the coconut-bread crumbs and lay onto the baking sheet.  Repeat until finished. 

   Pop the tray into the preheated oven for 25 minutes and then remove to rest and cool for a couple of minutes.  It’s hot!!!…

I like to serve this healthy and easy meal topped with a bit of extra shredded coconut & cilantro along with a side of rice and dipping sauce!  Enjoy!! 


Chorizo & Sweet Potato Breakfast Tacos (w/ Lime Crema)

I grew up in a city where Breakfast Burritos was the quintessential  breakfast..Now here in Texas, it’s quite similar, but it’s Breakfast TACOS instead that reign supreme.  …I’m also totally ok with that!!

So below is a fantastic version of my own that has spice, sweetness, savoriness, tanginess..need I go on??  Also, if there are leftovers, than simply throw them in an airtight Tupperware and reheat for the next days breakfast..or dinner 😉

*Gluten Free as well.

The Starting Lineup

  • 1-2 links Mexican chorizo sausage, about 8oz
  • 1 large sweet potato, cubed
  • 1/2 tsp chili powder
  • 1/2 tsp cumin, divided
  • 1/4 tsp cayenne pepper 
  • Kosher salt & black pepper
  • 6 large eggs, plus a splash of milk
  • Corn tortillas
  • 2 Tbsp canola or vegetable oil

Garnish

  • 1/2 cup of sour cream w/ the juice of 1 lime
  • Queso Fresco cheese, crumbled
  • Cilantro
  • Salsa (red or green)
  • Jalapeño slices
  • Lime wedges 

Let’s begin!!  In a small bowl, mix together the sour cream, lime juice and a 1/4 tsp of cumin;  cover and refrigerate.

Next up, in a large skillet over medium heat, cook the chorizo until browned (7-8 minutes) and transfer to a paper towel lined dish with a slotted spoon.  Keep that slightly spicy chorizo grease in the pan please!!

 Now you will add the cubed sweet potatoes along with the chili powder, remaining cumin, cayenne powder and a pinch of salt & pepper to the same hot skillet and cook until the edges are crisp and the center is soft.


  While the sweet potatoes are doing their thing, whisk the eggs and milk together before pouring them into a buttered non-stick skillet.  Cook, stirring and folding occasionally, over medium heat.  Once the eggs are ALMOST done and set, fold in the cooked chorizo and set aside.


    *If you can really multitask, I like to warm my tortillas a bit first before adding all of the goodies 😉

 Finally!!!  On your (warmed) tortillas, fill with the slightly charred sweet potatoes followed by the chorizo & egg mix.  Top each taco with your lime crema, salsa, cilantro, cheese & Jalapeños!!  Enjoy!!!….if it’s Sunday brunch then serve with a cerveza! 😉

Shredded Buffalo Chicken (Crockpot)

Just about everyone I know enjoys eating a plate of buffalo wings every now & again.  For me, the hotter the better really…but unfortunately, I’m usually still a bit hungry after.  Here you get that exact same great flavor, but in a fat and tasty sandwich form!  It’s filling for your entire family, kiddos included!!

Now if you’re eating on the lighter side these days or are perhaps gluten-free, you can simply stuff the buffalo chicken into some crunchy celery sticks alongside your favorite dipping sauce!  

Seriously, there is A LOT that can be done with this fantastic chicken filling!  Quesadillas, tacos, made into a dip with cream cheese, on grilled cheese, stuffed into an avocado…the options are almost endless!

The Starting Lineup

  • 4 boneless, skinless Chicken breasts
  • 12oz bottle Franks Red Hot (original)
  • 2 Tbsp butter
  • Cayenne pepper, to taste*
  • Ground black pepper, to taste
  • Garlic powder, to taste
  • Onion powder, to taste
  • Pinch of salt

*to taste: I used about 1/2 tsp of each

To Make Sandwiches (optional)

  • Large kaiser rolls or slider buns
  • Blue cheese crumbles 
  • Ranch dressing
  • Thick cut dill pickles
  • Red onion slices

Keeping light (optional)

  • Celery sticks
  • Ranch/blue cheese dressing for dipping  

Simple.  Simple.  Simple.  Spray your crockpot with a bit of nonstick spray and place the chicken breast in the bottom.  Sprinkle the 5 seasonings over the chicken (cayenne & black pepper, garlic & onion powder, pinch of salt). 

 Next pour in 3/4th of the bottle of Franks Red Hot Original sauce, cover, and set to low for 8 hours or high for about 5 hours.

Times up!!!  Add the butter to the now cooked chicken and using two forks, shred away!  Next, add in the remaining 1/4 cup of wing sauce and toss to coat.  Done!  Easy right?? 

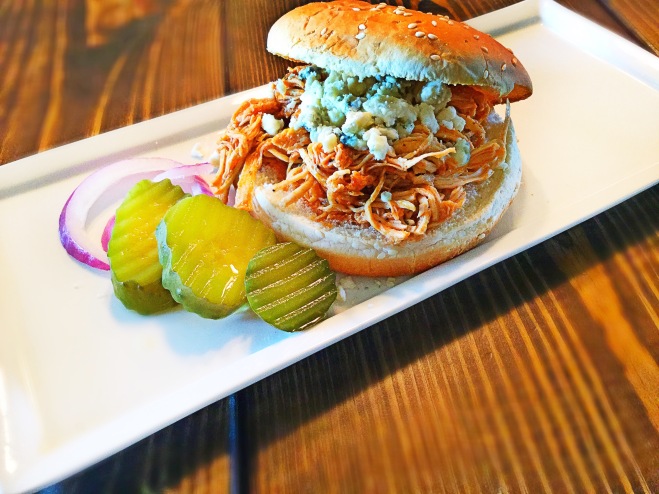
     Now if you’re making these into sandwiches, here’s how we like them!  I toast the buns first and place a heaping portion of the shredded buffalo chicken on top (depending, I’ll lather on a bit of ranch dressing onto the inside of each toasted bun before adding the chicken).  Then I top with a bit of the blue cheese crumbles and a few slices of thick cut dill pickles and red onion!  Delish!! 

 Lighter fare??  Clean and cut up some celery and simply stuff full of the shredded buffalo chicken.  Serve alongside either ranch or blue cheese dressing for dipping!  *The blue cheese fanatic that I am, I also like to add the crumbles to the top of these


Baja Fish Tacos (w/ Cilantro Slaw & Avocado Cream Sauce)

There’s not a thing I miss more from my days in San Diego than some baja-style fish tacos!!  Now don’t get me wrong, I love just about every taco I can get my hands on, but that fresh fish flavor and crisp acidic slaw may just have my heart…

My recipe below is sure to put you in the mood for the sound of the ocean…or maybe just a bit of Sublime on the stereo and a shot of tequila in the meantime ! 😉

**Gluten Free

The Starting Lineup

Fish Tacos

  • Corn tortillas (homemade or store bought, warmed)
  • 1.5 lbs Mahi-Mahi fillets
  • 1 cup rice flour
  • 1 tsp cumin
  • 1/2 tsp cayenne pepper
  • 1/2 tsp salt
  • 1/4 tsp each: garlic powder, onion powder and paprika 
  • Canola oil (to fill 1/4 up a pan/not fully cover the fish)

Cilantro Slaw

  • 1 bag shredded cabbage (sometimes I don’t use this entire bag for this, fyi)
  • 1/2 cup cilantro
  • 1/4 cup Red onion, chopped
  • 1 jalapeno, seeded and finely diced
  • Juice of 1 ripe lime
  • 1/4 cup mayonaisse (to taste)
  • 2 tsp Apple cider vinegar (to taste)
  • 1/2 tsp cumin
  • 1/2 tsp salt

Avocado Cream Sauce

  • 1 ripe avocado, pitted and skinned
  • 1/2 cup sour cream
  • 1/4 cup cilantro
  • 1 jalapeño, seeded and rough chopped
  • Juice of 1 lime
  • 1/2 tsp cumin
  • Pinch of salt
  • **if too thick, slowly add in 1/4-1/2 cup of water and blend

Let us begin this fiesta!!  Here I like to start with the Cilantro Slaw, followed by the sauce, so that the flavors meld together well..

Slaw

 This is super simple friends!  Start by rinsing the veggies and then get to a slicin’ and a dicin’!  

In a large bowl, combine all of the ‘Cilantro Slaw‘ ingredients and toss together.  Make sure to give it a taste test for seasoning, etc and then cover with plastic wrap.  Set aside in the refridgerator and we’re on to our sauce! 

   Sauce

 Begin by taking out your blender and prepping the cilantro and jalapeño.  

Now just like the above slaw, add all of the ‘Avocado Cream Sauce‘ ingredients to your blender and pulse till smooth.  If it’s too thick for your liking/hard to blend (always is for me..) then slowly add in a little bit of water at a time till the creamy, smooth consisitancy is achieved! 

   Pour into an airtight container and set aside in the refridgerator till dinner time.  **If you have a squeeze bottle (kind of like those old school ketchup and mustard bottles), those work great!

Fish Tacos

 Bring a saute pan with the canola oil up to temp (350 degrees-about medium heat).

In a shallow dish sprinkle the over the Mahi-Mahi.

In another shallow dish, add in the rice flour (along with the cumin, cayenne, salt, garlic & onion powder and paprika).  Whisk together.

 Finally, dredge each fish piece in the rice flour, shaking off any excess and transfer to a plate.  Once all your seasoned fish has been dredged, gently lay 2-3 pieces at a time into the hot oil.  **Do not overcrowd the pan..it would then ‘steam’, oil temp would drop and you can kiss your crunchy fish buh-bye! 

 Allow each side to cook appx 2 minutes, until a golden brown and transfer to a paper towel lined plate while you finish the rest. 

 **Meanwhile, I am making corn tortillas and keeping them warm.  For store-bought, still place each tortilla onto a HOT NON-oiled pan for about 20 seconds or so each side to slightly char and keep warm. 

  Assembly time!!!  Place a crunchy piece of mahi-mahi onto each warmed, corn tortilla.  Next top with a good helping of the Cilantro Slaw and a healthy drizzle of the Avocado Cream Sauce…and in true “me” fashion, I always add a few thinly sliced jalapeños for added kick!  Mmmmm…enjoy!!  **margarita optional 😉 


Pizza Rolls

Do you remember growing up and eating those famous Totino’s Pizza Rolls after school??  You know, the little crunchy squares filled with gooey cheese, sauce & meat that would always burn the roof of your mouth because you couldn’t wait for them to cool off?.. 

Well these are them recreated on steroids!  Soooo good!  What’s also great about these is that you can fill them with any pizza topping of your choice!  Make these upscale with roasted vegetables, salami, pesto, feta cheese or keep it the original way of mozzarella, marinara and pepperoni!!  Kids and adults alike will enjoy these to no end!

The Starting Lineup

  • Spring roll wrappers
  • 1 lb Italian sausage
  • 1 cup pepperoni, chopped
  • 1 cup mozzarella cheese
  • 1 jar marinara sauce
  • 1/2 onion, diced
  • 2 cloves garlic, minced
  • 2 tsp Italian seasoning
  • Kosher salt & pepper, to taste
  • 1/2 cup rice flour
  • 1 egg, beaten
  • 2 tbsp extra virgin olive oil
  • Vegetable oil (for frying)  

Begin by heating up the extra virgin olive oil in a sauté pan over medium heat while chopping & dicing the vegetables and pepperoni.  Also turn on your deep fryer to 350 degrees (or bring vegetable oil up to temp in a large heavy bottomed pan).

Next add the diced onion to the hot pan and sauté for 2-3 minutes, followed by the minced garlic for another minute. 

 Add the Italian sausage, Italian seasoning and S&P to the onion & garlic and brown till cooked through.  Drain on a paper towel lined bowl. 

 In a large bowl, combine the pepperoni, mozzarella cheese, marinara sauce.  Next, fold in the sausage mixture and set aside. 

   Assembly time!!  Now it’s not as tricky as you may think, but please follow along :).  Needed: a bowl of water, a beaten egg and pastry brush, the spring roll wrappers and a shallow dish with the rice flour in it.

Lightly sprinkle your work surface with a bit of rice flour.  Next dip 3 spring roll sheets (individually) into the water for about 15 seconds each and stack on top of eachother on the floured work surface.  Now add a scoop or two of the meat filling in the middle of the wrapper and then brush the beaten egg around the edges of the wrapper. 

 
 Fold up like a burrito and carefully dredge the entire roll with the rice flour and set aside as you finish assembling the rest. 

    Once done, take to the deep fryer and again, carefully drop into th hot oil and allow to fry for a few minutes until a light brown.  (These won’t brown heavily like you might think). 

 To serve, cut on the diagonal and serve with a side of warm marinara sauce for dipping.  Be careful as these rolls are hot…and addictive!!